| Interactive Swarm Space | |||||||||||
|
|
||||||||||||||||||||||||
|
Building a Patch Table of Contents Why Packing Your Synth Units in a Patch Makes Sense Why Packing Your Synth Units in a Patch Makes Sense Well, you could of course just initialize all your units in your ISOSynth main method(). As a matter of fact, we did that too for most of the developmental process. It's just a quick way to accomplish what you want. But what happens, when you would like to do something else? You have to resort to commenting out existing code or copy it to an external file or even keep a lot of separate main files and just have one of them active in your project window. This makes reusing your code cumbersome and messy. Well. Entrance, the Patch. A patch encapsulates your units neatly and makes it trivial to reuse them later, even multiple patches at the same time. We thought one step further and implemented a method to bypass individual patches on the fly. Not only does this let you schedule or trigger compositional parts in your ISOsynth performance, but it saves resources, because inactive patches consume no computational power whatsoever. So once more object-oriented programming has leaped to the rescue and made your projects not only more flexible but also more sexy... Example Patch "RhythmUnit & TriggerSampleUnit" For the patch example we chose to create something a little more interesting than the stuff we have shown you so far. We are going to make use of the TriggerSampleUnit along with the RhythmUnit. Two Units, that let you create custom, multi-layer, polyrhythmic, very precise grooves with your own sample material. The RhythmUnit is responsible for generating a rhythmic pulse stimulus which is sent to the "trigger" ControlPort of the TriggerSampleUnit, which in turn has a set of preloaded samples to play back when such a stimulus arrives. The amplitude of the stimulus is used as amplitude for the sample playback. RhythmUnit can also generated negative stimuli. These are used for selectively stopping the playback of the TriggerSampleUnit. While negative pulses close to zero create very flat decay fades, lower values create more steeper decays, up until -1.0. A trigger stimulus of -1.0 will bring playback to an immediate halt. For more information about the TriggerSampleUnit and the RhythmUnit, please consult our developer's documentation in Doxygen format. 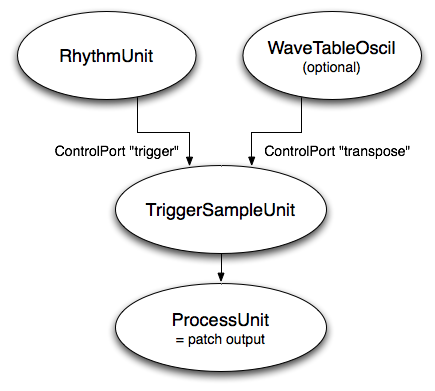 Trigger Sample Patch Architecture Let's start by looking at the overal structure of a patch in the header file. Header File iso_synth_triggersample_patch.h#ifndef _iso_synth_triggersample_patch_h_ #define _iso_synth_triggersample_patch_h_ #include <iso_synth/iso_synth_patch.h> Apart from the constructor and destructor (TriggerSamplePatch() and ~TriggerSamplePatch()) their are only two methods that are characteristic for a patch: void construct() throw(SynthException); instantiate your units, connect them and set default values for its parameters void consumeMessage(const com::Message& pMessage); receives messages (see Networking) and defines how the message components are distributed on your patch's ISOsynth units. Instantiation inside the main() methodThis patch will be created from your main method as such: //in your main() method: TriggerSamplePatch* patch = new TriggerSamplePatch(); You do however need to connect your patch's output unit to the global output unit ("outputUnit"), which you still do create in your main() method. For practical reasons we have decided to create a separate unit that serves as patch output, however, you could use any of your internal units, as long as a) they are last in a chain of connected units and b) you have provided them with a unit name when calling their constructor. patch->unit("patch_out")->connect(outputUnit); // the unit called "patch_out"
// is the last unit in our patch
We already mentioned the bypass feature of a patch. Here is how it works: Every patch has a port called "active" which can be set in realtime or scheduled for setting at a later point in time: patch->set("active", 0.0f);
will switch the patch to bypass immediately patch->schedule(TIME_IN_MS, "active", 0.0); will wait until TIME_IN_MS and then set the patch to inactive (0.0). Of course the inverse is possible too, simple set the "active" port to 1.0 and your patch is back in business. Please be aware that not all units treat being inactive in the same manor. Most of the simply stop and will continue from there once set active again, while others with reference to the absolute time of your ISOSynth might keep in sync until they are reactivated. Keep this in mind when setting patches to bypass that need to be in sync with other patches. iso_synth_triggersample_patch.cpp
#include "iso_synth_triggersample_patch.h"

using namespace iso;
using namespace iso::synth;

TriggerSamplePatch::TriggerSamplePatch()
	: Patch()
{}

TriggerSamplePatch::~TriggerSamplePatch()
{}


void
TriggerSamplePatch::construct() throw(SynthException)
{
   try
   {
      mRhythm = new RhythmUnit(5);  // 5-channels
      mTSample = new TriggerSampleUnit("PATH_TO_SAMPLE_FOR_FIRST_CHANNEL",5); // 5-chan

      mLFO = new WaveTableOscil("sinewave"); // modulator for transposition
                                             // of TriggerSample

      mOut = new ProcessUnit("patch_out");

      mTSample->setSample("PATH_TO_SAMPLE_FOR_2ND_CHANNEL",0,1);
      mTSample->setSample("PATH_TO_SAMPLE_FOR_3RD_CHANNEL",0,2);
      mTSample->setSample("PATH_TO_SAMPLE_FOR_4TH_CHANNEL",0,3);
      mTSample->setSample("PATH_TO_SAMPLE_FOR_5TH_CHANNEL",0,4);

      // set rhythm rasters:
      // syntax: Frame(NUM_BEATS_PLUS_1, CHAN_INDEX, RASTER...)
      mRhythm->set("raster",
                   Frame(13, 0.0, 1.0,0.5,0.25,1.0,0.0,1.0,0.5,0.25,1.0,0.0,0.0,0.0));
                   // 12-beat raster
      mRhythm->set("raster",
                   Frame(5, 1.0, 0.3, 0.3, 1.0, 0.0));
                   // 4-beat raster
      mRhythm->set("raster",
                   Frame(15, 2.0, 1.0,0.0,0.0,0.0,0.0,0.0,0.0,0.0,0.0,0.0,
                                  0.0,0.4,0.0,0.0));
      mRhythm->set("raster",
                   Frame(7, 3.0, 0.0,1.0,0.0,0.5,0.0,0.0));
      mRhythm->set("raster",
                   Frame(19, 4.0, 0.0,0.0,0.5,0.0,0.0,0.0,0.0,0.0,0.0,0.0,
                                  0.0,0.0,0.0,0.0,0.0,0.0,0.0,0.0));

      // set interval time in ms (groove playback speeds per channel)
      mRhythm->set("interval", Frame(5,		90.0, 120.0, 180.0, 60.0, 120.0 ));

      // set LFO parameters
      mLFO->set("frequency", 0.2);
      mLFO->set("offset", 1.0);
      mLFO->set("amplitude", 0.5);

      mRhythm->connect(mTSample, "trigger");
      mLFO->connect(mTSample, "transpose");
      mTSample->connect(mOut);

      // add all units to the mUnits Vector, so they can be automatically managed!!
      mUnits.append(mRhythm);
      mUnits.append(mTSample);
      mUnits.append(mLFO);
      mUnits.append(mOut);
   }
   catch (SynthException& e)
   {
      throw;
   }
}
Most of the stuff here is pretty self-explanatory. But don't forget to append the units you created to mUnits, so that hey can be automatically managed by the patch itself (e.g. the afformentioned bypass feature). In this example we decided not to include any message processing. If you are interested in controling your patch with a swarm, we would like to direct you to the Networking chapter in the ISOFlock section. |
| Last updated: May 15, 2024 |