| Interactive Swarm Space | |||||||||||
|
|
||||||||||
|
Hello Swarm World Table of Contents Creating Swarm Simulations Before you start your coding, make sure you have the necessary libraries installed, as described in the Installation chapter. We will begin our swarm code example with a very simple example from which we will gradually expand into a comprehensive flocking swarm. This will enable us to introduce important concepts and techniques used in the swarm one by one. We recommend you try these examples for yourself and try to understand them as you go. You will notice that all of the examples assume you are using a Macintosh Programming environment (XCode) - there is however a kdevelop project for Linux programmers as well. ISO does not support Windows programming environments and probably never will. Let's start by opening the XCode File (iso_flock_app/project/xcode/iso_flock_app.xcodeproj). Inside the folder where you can finde the Xcode project file, there are a handful of useful Python scripts that let you create a standalone version of your own flock. This means you are able to pass on your precious flock to other computers that don't have the necessary libraries installed. There is a catch to this convenience, the created application bundle is around 200 MB in size (because it contains all the libraries). At the bottom of this page we will explain the process of creating a standalone bundle. Within your open XCode project file, you will find four folders in your "Groups & Files" panel: "Sources" contains a set of example source codes that can serve as starting point to create your own flock. "Docs" contains the ISO API documentation in reference format. "Resources" contains some compilation scripts needed by XCode. "External Frameworks and Libraries" contains the links to all of your installed libraries, if you didn't install one of the needed libraries or didn't install it at the right location, the according name will colored red. "Products" will contain your compiled products - when you open the XCode project for the first time, all of these will be colored red, because you haven't compiled anything yet. You will mostly be active inside the "Sources" folder. If you click on the folder itself, the top right-hand panel shows a list of all contained source codes. Please notice the "target checkbox", which is the last column of this list. Only one code file must be checked (activated), this one will be the one used by the compiler. The reason for this is that all files contain a main() method, which is the starting point of a program - if more than one file would be checked as target, the compiler wouldn't know which one to pick. In this tutorial we will start not by duplicating an existing flock source code example, but by starting from scratch. Right-click on the "Sources" folder and select "Add..." - "New File". Choose "C++ File" in the following dialog and click on "Next". Let's call the new source code file "tutorial0.cpp" - we don't need a header file, so you can uncheck "Also create tutorial0.h". Make sure the path is set to the code folder (iso_flock_app/code) to keep source code files and project files neatly separated. Now we are ready to write our first flock source code. Hello World 0: Placing Agents in a Swarm In this first example all we will try to accomplish is to put 50 agents in a swarm and show them on screen. There will be no flying or flocking whatsoever, just a set of dots representing the agents. However in doing so we can show you some of the most basic techniques, namely: creating a swarm, adding agents to it, adding parameters and even a first simple behavior. Let's look at the code:
#include <iso_flock/iso_flock_includes.h>
#include <QApplication>
#include <iostream>
using namespace iso;
using namespace iso::flock;
int main( int argc, char **argv )
{
QApplication a(argc,argv);
GLWindow& window = GLWindow::get();
try
{
Simulation& simulation = Simulation::init(1.0);
// setup swarm pointer + add parameter types to it
Swarm* swarm = new Swarm("tutorial_swarm");
swarm->addAgentParameter( "position", 3 );
swarm->addAgentParameter( "velocity", 3 );
unsigned int agentCount = 50;
swarm->addAgents(agentCount);
// randomize positions
// (otherwise all agents would be on the same default position)
swarm->randomize( "position",
math::Vector<float>(3, -1.0, -1.0, -1.0),
math::Vector<float>
Let's look at the most important concepts: A simulation contains all swarms and is responsible for running them. It can be considered the environment in which you conduct your swarm experiments. A swarm contains a number of agents. These agents have a couple of things in common like: having the same parameter types (but individual values) and having the same behaviors. We have implemented swarms as a convenient mean to interact with a group of agents. Otherwise you would have to iterate over all agents and call their respective functions which would make your code rather bloated with iteration statements. Swarm* swarm = new Swarm("tutorial_swarm");
Create a new swarm (or more precisely, a pointer to a new swarm) and name it swarm->addAgentParameter("position", 3 );
Add a new parameter type (e.g. the parameter for position) and define the number of dimensions (position in our swarm is a location in a three-dimensional space). Notice that the parameter will belong to the individual agents within the swarm and not the swarm itself. Swarm parameters can be set with: addSwarmParameter() - however the rest of the function header is exactly the same as in addAgentParameter() swarm->addAgents(100); Define how many agents are in the swarm swarm->randomize( "position",
math::Vector(3, -1.0, -1.0, -1.0),
math::Vector(3, 1.0, 1.0, 1.0) );
Randomize all parameter values of this swarm and supply the range wherein the randomization takes place. The two range vectors share the form: math::Vector(number_of_dimensions, x, y, z, ...)
window.panel().showSwarm(
      "tutorial_swarm",         //the swarm's name
      "position",               //position parameter name
      "velocity",               //velocity (orientation+speed) parameter name
      math::Vector<float>(4, 0.0, 0.0, 0.0, 1.0),       //color of the agent's shape
      0.1,                                //scale of agent's shape
      math::Vector<float>(4, 0.0, 0.0, 0.0, 1.0),       //color of the agent's trail
      100,                                //max trail length (in simulation steps)
      0.01 );                             //dimming factor of the trail
Visualisation: ISO Flock uses OpenGL for drawing. The above code line tells the GLPanel (which is inside the main application window) the pointers to the position and velocity parameters of the agents of a particular swarm (i.e. our "tutorial_swarm"). It's safe to assume that the results of our first Hello World application have not quite yet satisfied your expectations. Let's now add some motion to these agents. If you have compiled the first Hello World code, you can extend it by inserting the lines that are printed in bold face:
#include <iso_flock/iso_flock_includes.h>
#include <QApplication>
#include <iostream>

using namespace iso;
using namespace iso::flock;

int main( int argc, char **argv )
{
   QApplication a(argc,argv);
   GLWindow& window = GLWindow::get();

   try
   {
      Simulation& simulation = Simulation::init(1.0);

      // setup swarm
      Swarm* swarm = new Swarm("tutorial_swarm");

      swarm->addAgentParameter( "position", 3 );
      swarm->addAgentParameter( "velocity", 3 );
      swarm->addAgentParameter( "acceleration", 3 );
      swarm->addAgentParameter( "force", 3 );
      swarm->addAgentParameter( "mass", 1, 0.01 ); //watch out: default is not 0.0

      swarm->addAgentBehavior( "resetForce", ResetBehavior( "", "force" ) );

      swarm->addAgentBehavior( "randomize", RandomizeBehavior( "", "force" ) );
      swarm->set("randomize_range", math::Vector<float>(3, 0.0001, 0.0001, 0.0001 ) );

      swarm->addAgentBehavior( "velocorrection", DampingBehavior( "velocity", "force" ) );
      swarm->set("velocorrection_prefVelocity", 0.10);
      swarm->set("velocorrection_amount", 0.5);

      swarm->addAgentBehavior( "acceleration",
                               AccelerationBehavior( "mass velocity force",
                                                     "acceleration") );
      swarm->set("acceleration_maxAngularAcceleration", math::Vector<float>(3, 0.1, 0.1, 0.1) );
      swarm->set("acceleration_maxLinearAcceleration", math::Vector<float>(3, 0.5, 0.5, 0.5) );

      swarm->addAgentBehavior( "integration",
                               EulerIntegration("position velocity acceleration",
                                                "position velocity") );
      swarm->set("integration_timestep", 0.1);

      unsigned int agentCount = 50;
      swarm->addAgents(agentCount);

      swarm->randomize( "position",
                        math::Vector<float>(3, -1.0, -1.0, -1.0),
                        math::Vector<float>(3, 1.0, 1.0, 1.0) );

      // add swarm agents to OpenGL display

      window.panel().showSwarm( "tutorial_swarm",
                                "position",
                                "velocity",
                                math::Vector<float>(4, 0.0, 0.0, 0.0, 1.0), 0.1,
                                math::Vector<float>(4, 0.0, 0.0, 0.0, 1.0), 100, 0.01 );

      simulation.start();
   }
   catch(FlockException& e)
   {
      std::cout << e << "\n";
      return 1;
   }

   window.resize( 600, 480 );
   window.show();

   return a.exec();
}
For someone that has never programmed or at least read about swarm simulations, these new additions to our code might be difficult to understand. Therefore we have put together a graph attempting to improve your understanding. Behaviors (e.g. "randomize") are depicted as white boxes and arguments (e.g. "randomize_range") to these behaviors as oval shapes. The boxes on the right contain explanations to a specific processing steps. Notice how in addition to the two parameters "position" and "velocity" you are familiar with from the previous example, there are three new parameter types: acceleration, force and mass, whereas mass is the only non-three-dimensional parameter type. 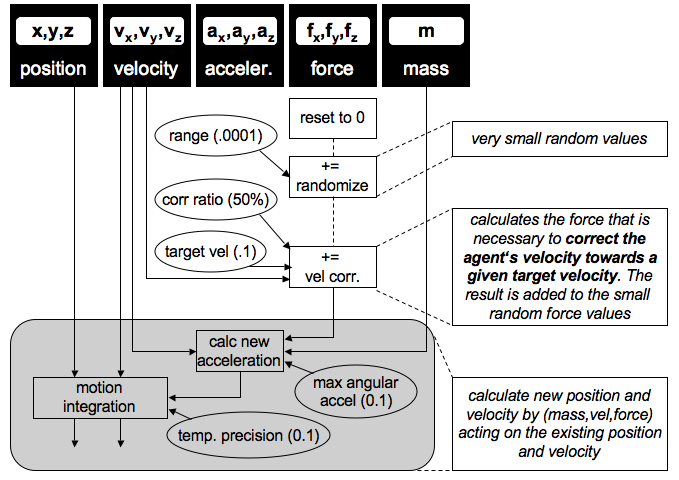
Parameter Force: In space, objects with a certain velocity would continue to move through space at that velocity for eternity. However under normal circumstances there are always forces involved acting on the agents velocity. Again keep in mind that velocity in this context is a 3D vector and not just an amount of speed - so it's not only how fast an object moves but also in what direction it is heading! In our example force is only used for one purpose, change the agents velocity towards a specific target speed (0.1), while at the same time adding some degree of randomness to the agents' motion. The force parameter can also be appropriate for other external forces acting on the agent, e.g. gravity, friction, repulsion and so on - we will see more of these in our later examples. In order to calculate the sum of all forces involved, one can simply add all force vectors together. In our graph below, this is depicted by a "+=" sign. This simplification is a specific property of force and is manifested in the ForceBehavior in such a way, that force is almost always an output parameter, hence the dotted connection between the behavior boxes in the following graph. This rule of thump may need some time to get used to. Parameter Mass: In this example the mass is constant and effects only the acceleration of an agent. Parameter Acceleration: This is merely an intermediate parameter and behavior to determine how force and mass will affect the position and velocity of the next step. Unlike force, acceleration doesn't need to be reset, because it is recalculated each step from scratch. Acceleration is restricted by two behavior arguments: "max angular acceleration" and "max linear acceleration" - which are both used by the acceleration behavior as restrictions. Behavior call syntax
swarm->addAgentBehavior( "acceleration",
                            AccelerationBehavior( "mass velocity force",
                            "acceleration") );
As mentioned before, we supply a swarm (not the agents themselves) with a set of behaviors. This behaviors can be part of the swarm superstructure itself or the individual agents within. In the code extract above we add the acceleration behavior to the swarm's agents. Here is the general syntax for adding a behavior:
SWARM_OBJECT->addAgentBehavior( "BEHAVIOR_NAME",
                                BEHAVIOR_CLASS( "STRING_OF_INPUT_PARAMETERS",
                                                "STRING_OF_OUTPUT_PARAMETERS") );
If you were to assign a behavior to the swarm superstructure itself, you would replace "addAgentBehavior()" by "addSwarmBehavior()". Keep in mind, swarms can be treated as agents and since the Swarm class actually inherits from the Agent class, a swarm is basically a special case of an agent. The distinction of addAgentBehavior() and addSwarmBehavior() simply serves to identify the owner of the behavior. Likewise, addAgentBehavior() (see above) has it's corresponding method addSwarmBehavior(). Almost all behaviors have internal arguments you can set using the following syntax example:
swarm->set("acceleration_maxAngularAcceleration", 0.1);
or in more general syntax:
SWARM_OBJECT->set("BEHAVIORNAME_ARGUMENTNAME", FLOAT_VALUE);
Notice that an argument is always preceded by its behavior's name, delimited by an underscore character. For a complete set of behaviors and their arguments, please refer to the in-depth section Behaviors. Hello World 2: Motion Boundaries In this step, we will introduce motion boundaries to the swarm, so that its agents will stay inside a specific area. There are a couple of approaches that are applicable to this task, all of them are actually behaviors that act either on the force or the position/velocity parameter pair. The comprehensive "Behavior" section will list all of these, so we will discuss just one right now: The BoundaryRepulsionBehavior:
//same includes as the previous examples...


int main( int argc, char **argv )
{
   QApplication a(argc,argv);
   GLWindow window;

   try
   {
      Simulation& simulation = Simulation::init(1.0);

      // setup swarm
      Swarm* swarm = new Swarm("tutorial_swarm");

      swarm->addAgentParameter( "position", 3 );
      swarm->addAgentParameter( "velocity", 3 );
      swarm->addAgentParameter( "acceleration", 3 );
      swarm->addAgentParameter( "force", 3 );
      swarm->addAgentParameter( "mass", 1, 1.0 );

      swarm->addAgentBehavior( "resetForce", ResetBehavior( "", "force" ) );

      swarm->addAgentBehavior( "randomize", RandomizeBehavior( "", "force" ) );
      swarm->set("randomize_range", math::Vector<float>(3, 0.1, 0.1, 0.1) );

      swarm->addAgentBehavior( "velocorrection", DampingBehavior( "velocity", "force" ) );
      swarm->set("velocorrection_prefVelocity", 0.10);
      swarm->set("velocorrection_amount", 0.5);

      swarm->addAgentBehavior( "positionRepulsion",
                               BoundaryRepulsionBehavior( "position", "force" ) );

      swarm->set("positionRepulsion_lowerBoundary", math::Vector<float>(3, -5.0, -5.0, -5.0));
      swarm->set("positionRepulsion_upperBoundary", math::Vector<float>(3, 5.0, 5.0, 5.0));
      swarm->set("positionRepulsion_maxDist", 2.0);
      swarm->set("positionRepulsion_amount", 0.03);

      swarm->addAgentBehavior( "acceleration",
                               AccelerationBehavior( "mass velocity force",
                               "acceleration") );
      swarm->set("acceleration_maxAngularAcceleration", math::Vector<float>(3, 0.1, 0.1, 0.1) );

      swarm->addAgentBehavior( "integration",
                               EulerIntegration("position velocity acceleration",
                               "position velocity") );

      swarm->set("integration_timestep", 0.1);

      unsigned int agentCount = 200;

      swarm->addAgents(agentCount);

      swarm->randomize( "position",
                        math::Vector<float>(3, -1.0, -1.0, -1.0),
                        math::Vector<float>(3, 1.0, 1.0, 1.0) );

      // add swarm agents to OpenGL display

      window.panel().showSwarm( "tutorial_swarm",
                                "position",
                                "velocity",
                                math::Vector<float>(4, 0.0, 0.0, 0.0, 1.0),
                                0.1,
                                math::Vector<float>(4, 0.0, 0.0, 0.0, 1.0),
                                100,
                                0.01 );

      simulation.start();

   }
   catch(base::Exception& e)
   {
      std::cout << e << "\n";
      return 1;
   }

   window.resize( 600, 480 );
   window.show();

   return a.exec();
}
So now, we have three distinct behaviors (ignoring the rather dull "reset" behavior) namely the "randomize" behavior, the "corrvelocity" behavior and the new "positionRepulsion". As a reminder, the order in which these behaviors are defined is irrelevant since the effect they have on the force is cumulative. Boundary Repulsion Behavior 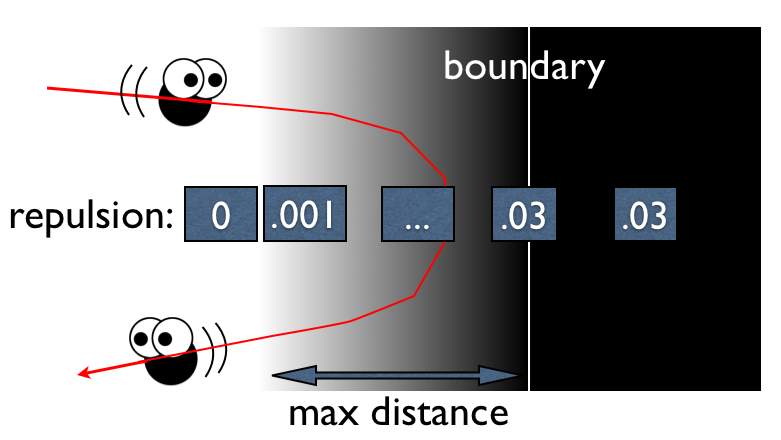
Let's look at the arguments of the BoundaryRepulsionBehavior:
swarm->addAgentBehavior( "positionRepulsion",
                         BoundaryRepulsionBehavior( "position", "force" ) );

swarm->set("positionRepulsion_lowerBoundary", math::Vector<float>(3, -5.0, -5.0, -5.0));
swarm->set("positionRepulsion_upperBoundary", math::Vector<float>(3, 5.0, 5.0, 5.0));
swarm->set("positionRepulsion_maxDist", 2.0);
swarm->set("positionRepulsion_amount", 0.03)
lowerBoundary and upperBoundary: These two 3D points define the min/max edges of the bounding box. maxDist: distance from the boundary at which the repulsion behavior starts acting (gradient gray area in the figure above). The closer the agent gets to the boundary itself (white line) the greater the repulsion will get, up until the boundary itself where the repulsion reaches its maximal force. Outside the boundary (black area), this maximal repulsion force is kept indefinitely. So even if it's very small, agents are certain to return to the area inside the boundaries. amount: maximal repulsion force (in the code example and image: "0.03") Hello World 3: Flocking Behavior Finally, the good stuff :). Until now, our agents have been blindly strolling around, unaware of each other. This is about to change. We are now introducing the basic principles of flocking and you will spot the difference immediately. Craig Reynolds' (homepage) flocking behavior is based on three principles: Evasion: Avoid very close nearby neighbors. Cohesion: Move towards the average position (= center of mass) of your closest neighbors. Alignment: Move in the same direction and at the same speed as your neighbors. Notice how Evasion and Cohesion seem to cancel each other out, while in reality it's those two behaviors that are responsible for the clusters of agents that appear in a Renolds swarm-> Without Alignment however, these clusters wouldn't show any interesting motion behavior. They would either disperse again or just stay on the same spot oscillating between Evasion and Cohesion. If you remember the "velocity correction" behavior introduced in our Tutorial 1: Moving Agents, it's purpose was to make sure the agents' speed stays more or less the same. This comes in handy especially now that we have a whole bunch of forces acting on these agents. In order to implement these principles, agents need some sort of awareness of their neighborhood. In ISO Flock this is done by the concept of spaces: Don't confuse parameter spaces with the simulation (space) itself. The simulation (space) holds the agents themselves whereas parameter spaces only hold the agents' parameters. Agents might make use of several spaces at the same time. Here is an example: All agents of a flock calculate the distances between each other using a space that holds their individual "position" parameters, while at the same time, agents look for other agents that have a similar "velocity" using another space comparing only their "velocity" parameter. This kind of neighborhood space is possible for any kind of parameter. However you will most frequently create a position-based parameter space with your simulation. After all, that's how physical beings operate, the keep their attention with the beings that are closest to them by position. Once an agent knows its neighborhood, any kind of parameter can be read from its neighbors. In the case of alignment, agents will read the velocity of their position-based neighbors. A parameter space for interaction
#include <iso_flock/iso_flock_includes.h>
#include <QApplication>
#include <iostream>
using namespace iso;
using namespace iso::flock;
int main( int argc, char **argv )
{
QApplication a(argc,argv);
GLWindow& window = GLWindow::get();
try
{
Simulation& simulation = Simulation::init(10.0);
// setup space
simulation.space().addSpace( new space::Space("agent_position_space",
                                              new space::ANNAlg(3) ) );
// setup swarm
Swarm* swarm = new Swarm("tutorial_swarm");
swarm->addAgentParameter( "position", 3 );
swarm->assignNeighbors( "position",
"agent_position_space",
true,
new space::NeighborGroupAlg( 3.0, 8, true ) );
swarm->addAgentParameter( "velocity", 3 );
swarm->addAgentParameter( "acceleration", 3 );
swarm->addAgentParameter( "force", 3 );
swarm->addAgentParameter( "mass", 1, 0.1 );
swarm->addAgentBehavior( "resetForce", ResetBehavior( "", "force" ) );
swarm->addAgentBehavior( "randomize", RandomizeBehavior( "", "force" ) );
swarm->set("randomize_range", math::Vector<float>(3, 0.1, 0.1, 0.1) );
swarm->addAgentBehavior( "corrvelocity", DampingBehavior( "velocity", "force") );
swarm->set("corrvelocity_prefVelocity", 0.20); //set default
swarm->set("corrvelocity_amount", 0.5);
swarm->addAgentBehavior( "cohesion",
CohesionBehavior( "position:agent_position_space",
"force") );
swarm->set("cohesion_minDist", 0.0);
swarm->set("cohesion_maxDist", 1.7);
swarm->set("cohesion_amount", 0.1);
swarm->addAgentBehavior( "alignment",
AlignmentBehavior("position:agent_position_space velocity",
"force") );
swarm->set("alignment_minDist", 0.0);
swarm->set("alignment_maxDist", 1.7);
swarm->set("alignment_amount", 0.5);
swarm->addAgentBehavior( "evasion",
EvasionBehavior( "position:agent_position_space",
"force") );
swarm->set("evasion_maxDist", 1.0);
swarm->set("evasion_amount", 0.5);
swarm->addAgentBehavior( "positionRepulsion",
BoundaryRepulsionBehavior( "position", "force" ) );
swarm->set("positionRepulsion_lowerBoundary", math::Vector<float>(3, -5.0, -5.0, -5.0));
swarm->set("positionRepulsion_upperBoundary", math::Vector<float>(3, 5.0, 5.0, 5.0));
swarm->set("positionRepulsion_maxDist", 2.0);
swarm->set("positionRepulsion_amount", 0.13);
swarm->addAgentBehavior( "acceleration",
AccelerationBehavior( "mass velocity force",
"acceleration") );
swarm->set("acceleration_maxAngularAcceleration", 0.1);
swarm->addAgentBehavior( "integration",
EulerIntegration("position velocity acceleration",
"position velocity") );
swarm->set("integration_timestep", 0.1);
unsigned int agentCount = 20;
swarm->addAgents(agentCount);
swarm->randomize( "position",
math::Vector<float>(3, -1.0, -1.0, -1.0),
math::Vector<float>(3, 1.0, 1.0, 1.0) );
// add swarm agents to OpenGL display
window.panel().showSwarm( "tutorial_swarm",
"position",
"velocity",
math::Vector<float>(4, 0.0, 0.0, 0.0, 1.0),
0.1,
math::Vector<float>(4, 0.0, 0.0, 0.0, 1.0),
100,
0.01 );
simulation.start();
}
catch(base::Exception& e)
{
std::cout << e << "\n";
Let's dissect the new code additions: simulation.space().addSpace( new space::Space("agent_position_space",
new space::ANNAlg(3) ) );
This will create a new three-dimensional (point-)space called "agent_position_space", using the ANN algorithm to calculate each agent's neighborhood (which agents are the closest and how close are they). Literally the instruction follows the syntax:
simulation.space().addSpace( new space::Space("NAME_OF_SPACE",
                                              new space::ALGORITHM(NUM_OF_DIMENSIONS) ) );
Some of you might have noticed that this is done accessing the singleton of the SpaceManager class ("simulation.space()."). To assign the "position" parameter of the agents to this space ("agent_position_space"), the following line will generate a neighborhood inside the space and assign the parameter to it: swarm->assignNeighbors( "position",
"agent_position_space",
true,
new space::NeighborGroupAlg( 3.0, 8, true ) );
in generic form: swarm->assignNeighbors( "AGENT_PARAM_NAME",
"SPACE_NAME",
VISIBILITY_FLAG,
new space::NeighborGroupAlg( RADIUS,
NEIGHBOR_COUNT,
REPLACE_FLAG ) );
AGENT_PARAM_NAME = parameter name you specified in addAgentParameter() earlier. SPACE_NAME = name you assigned to the space in your addSpace() function. VISIBILITY_FLAG = think of parameters as both input to and output from a space, meaning: parameters are projected in the space and are therefore visible to other parameters in this space (input) and are at the same time updated based on what happens inside this space (output).
See the example below. RADIUS = visibility radius of a parameter. Yes it's a sphere, not a box ;-). NEIGHBOR_COUNT = maximal number of simultaneous neighbor parameters. REPLACE_FLAG = this is a performance-critical flag.
Example of a complex interaction Here's an example that should illustrate the visibility flag behavior as well as the use of NeighborGroupAlg. Let's think of a swarm of insects buzzing around a couple of chinese lantern holders, who are carrying them while walking around. The chinese lantern holders are not consciously aware of the insects, the insects however are very passionate about these pretty red lights and try to get as close to them as possible, trying however to avoid being burnt by the candle heat inside the lanterns. If you would simulate this interplay between insects and lights, we would have to create two separate spaces, one for calculating the interaction amongst the insects themselves (called e.g. "insect_position_space" space) and one for the interaction between lights and insects (e.g. "light_position_space"). You can break it down to six key points: 1. lights are visible to insects lightSwarm->assignNeighbors( "position",
"light_position_space",
true,
NULL );
2. lights are unaffected by insects lightSwarm->assignNeighbors( "position",
"light_position_space",
true,
NULL );
3. insects are invisible to lights insectSwarm->assignNeighbors( "position",
"light_position_space",
false,
new space::NeighborGroupAlg( ... ) );
4. insects are affected by lights insectSwarm->assignNeighbors( "position",
"light_position_space",
false,
new space::NeighborGroupAlg( ... ) );
5. insects are visible to other insects insectSwarm->assignNeighbors( "position",
"insect_position_space",
true,
new space::NeighborGroupAlg( ... ) );
6. insects are affected by other insects insectSwarm->assignNeighbors( "position",
"insect_position_space",
true,
new space::NeighborGroupAlg( ... ) );
Notice the respective use of the space names "light_position_space" and "insect_position_space". For simplicity, we assumed the lantern holders aren't even aware of themselves, but given the information so far, you should be able to rewrite the assignNeighbors() function for lightswarm. Would you like to try? Scroll down for the solution... lightSwarm->assignNeighbors( "position", "light_position_space", true, new space::NeighborGroupAlg( 0.8, 5, true ) ); You got it right? Usage of parameter spaces in a Renolds type swarm
swarm->addAgentBehavior( "cohesion",
                         CohesionBehavior( "position:agent_position_space",
                         "force") );

swarm->set("cohesion_minDist", 0.0);
swarm->set("cohesion_maxDist", 1.7);
swarm->set("cohesion_amount", 0.1);

swarm->addAgentBehavior( "alignment",
                         AlignmentBehavior("position:agent_position_space velocity",
                         "force") );

swarm->set("alignment_minDist", 0.0);
swarm->set("alignment_maxDist", 1.7);
swarm->set("alignment_amount", 0.5);

swarm->addAgentBehavior( "evasion",
                         EvasionBehavior( "position:agent_position_space",
                         "force") );

swarm->set("evasion_maxDist", 1.0);
swarm->set("evasion_amount", 0.5
The overall syntax should look familiar to you by now. As always, we add a behavior and set some attributes. The important difference here is the following: as input parameter list to the behavior, we don't use one of the agents own parameters (like "position", "mass", ...), but we access the "position" parameters of our neighbor agents, as provided by the "agent_position_space". Inside our swarm->assignNeighbors() function earlier, we assigned the NeighborGroupAlg object a maximum number of 4 neighbors. So there can be up to four neighbor agents at a given time whose positions affect the behavior of an agent. If there are no agents in the neighbor list, there are no input parameters to the behavior and consequently the behavior will have no effect. Hello World 4: Controlling Swarms So now, your swarm is up and running, buzzing about quite joyfully and ... uncontrollably. That's right, once you start your simulation, there is no means to control let alone interact with the swarm. Scheduling eventsBefore we introduce methods to directly control your swarm by external means, let's first look at methods to schedule events, changing specific attributes of behaviors or even agents themselves at a predefined time. You can re-use the code from Hello World 3: Flocking Behavior for this tutorial section. Simply add the following lines of code before the "simulation.start();" instruction.
// schedule integration steps

simulation.event().addEvent( new SetParameterEvent(2000.0,
                                                   "tutorial_swarm",
                                                   "integration_timestep",
                                                   math::Vector<float>(1, 0.001),
                                                   4000.0 ));
simulation.event().addEvent( new SetParameterEvent(20000.0,
                                                   "tutorial_swarm",
                                                   "integration_timestep",
                                                   math::Vector<float>(1, 0.02),
                                                   4000.0 ));
simulation.event().addEvent( new SetParameterEvent(30000.0,
                                                   "tutorial_swarm",
                                                   "integration_timestep",
                                                   math::Vector<float>(1, 0.002),
                                                   4000.0 ));
simulation.event().addEvent( new SetParameterEvent(40000.0,
                                                   "tutorial_swarm",
                                                   "integration_timestep",
                                                   math::Vector<float>(1, 0.1),
                                                   4000.0 ));
simulation.event().addEvent( new SetParameterEvent(50000.0,
                                                   "tutorial_swarm",
                                                   "integration_timestep",
                                                   math::Vector<float>(1, 0.01),
                                                   4000.0 ));
simulation.event().addEvent( new SetParameterEvent(48000.0,
                                                   "tutorial_swarm",
                                                   "integration_timestep",
                                                   math::Vector<float>(1,  0.033),
                                                   4000.0 ));
simulation.event().addEvent( new SetParameterEvent(52000.0,
                                                   "tutorial_swarm",
                                                   "integration_timestep",
                                                   math::Vector<float>(1, 0.002),
                                                   4000.0 ));
simulation.event().addEvent( new SetParameterEvent(62000.0,
                                                   "tutorial_swarm",
                                                   "integration_timestep",
                                                   math::Vector<float>(1, 0.5),
                                                   4000.0 ));
simulation.event().addEvent( new SetParameterEvent(72000.0,
                                                   "tutorial_swarm",
                                                   "integration_timestep",
                                                   math::Vector<float>(1, 0.001),
                                                   4000.0 ));

simulation.event().addEvent( new SetParameterEvent(10000.0,
                                                   "tutorial_swarm",
                                                   "cohesion_active",
                                                   math::Vector<float>(1,
                                                   0.0) ));
simulation.event().addEvent( new SetParameterEvent(10000.0,
                                                   "tutorial_swarm",
                                                   "alignment_active",
                                                   math::Vector<float>(1,
                                                   0.0) ));
simulation.event().addEvent( new SetParameterEvent(20000.0,
                                                   "tutorial_swarm",
                                                   "cohesion_active",
                                                   math::Vector<float>(1,
                                                   1.0) ));
simulation.event().addEvent( new SetParameterEvent(20000.0,
                                                   "tutorial_swarm",
                                                   "alignment_active",
                                                   math::Vector<float>(1,
                                                   1.0) ));

simulation.event().addEvent( new SetParameterEvent(10000.0,
                                                   "tutorial_swarm",
                                                   "cohesion_active",
                                                   math::Vector<float>(1,
                                                   0.0) ));
simulation.event().addEvent( new SetParameterEvent(10000.0,
                                                   "tutorial_swarm",
                                                   "alignment_active",
                                                   math::Vector<float>(1,
                                                   0.0) ));
simulation.event().addEvent( new SetParameterEvent(20000.0,
                                                   "tutorial_swarm",
                                                   "cohesion_active",
                                                   math::Vector<float>(1,
                                                   1.0) ));
simulation.event().addEvent( new SetParameterEvent(20000.0,
                                                   "tutorial_swarm",
                                                   "alignment_active",
                                                   math::Vector<float>(1,
                                                   1.0) ));
All of these instructions follow this syntax:
simulation.event().addEvent( new SetParameterEvent(EVENT_TIME,
                                                   "SWARM_NAME",
                                                   "PARAMETER_NAME",
                                                   TARGET_VALUE_VECTOR,
                                                   INTERPOLATION_TIME ));
EVENT_TIME = time in milliseconds, at which the event will be triggered (= parameter set to a new value) PARAMETER_NAME = agent's OR behavior's parameter name TARGET_VALUE_VECTOR = parameter value, has to be a float vector following the format: math::Vector<float>(NUM_OF_DIMENSIONS, VAL_1, ..., VAL_NUM) INTERPOLATION_TIME = period of time in milliseconds over which the parameter is gradually changed towards the target value (aka. interpolation) No big deal, right? Notice that the lower half of the examples have no INTERPOLATION_TIME argument. That's because these parameters are simple switches to turn a behavior on and off, therefore interpolation wouldn't make a lot of sense here. Omitting this argument is the same as specifying it with a value of 0.0. Also worth mentioning, you can actually set the parameter value of an individual agent inside a swarm. In that case your syntax structure contains one more argument, the agent index, starting at zero naturally:
simulation.event().addEvent( new SetParameterEvent(EVENT_TIME,
                                                   "SWARM_NAME",
                                                   AGENT_INDEX,
                                                   "PARAMETER_NAME",
                                                   INTERPOLATION_TIME ));
The ISO project has recently gotten a big boost what concerns the application of external control interfaces. Thanks to Daniel, a comprehensive OSC interface is now available that lets you control almost every aspect of manipulating your swarms. The chapter Networking will give you all the information you need to connect your ISO flocks to external interfaces - either as target instances or as control data source. At the moment MIDI is not working and since OSC is working so well, we are not considering it a priority. If you are unable to use OSC for any of your projects, you may contact us and we will be looking into it. Building a Stand-Alone Application of Your Flock Open the Terminal and navigate to the same directory as your XCode project file iso_flock_app.xcodeproj. There is a python script here called standalone.py which will take the build results of your already compiled project and create a standalone version from it. The script assumes, that the build directory is the same as the project directory. Since some users prefer to use an external build directory, it's a good idea to check your XCode preferences (Building - "Place Build Products in") and, if necesssary, copy your Release folder from your custom build location to the build folder inside your project directory. For our example the path should be: Start the script by entering the following commands. cd iso_flock_projects/project/xcode (navigate to the xcode folder) ./standalone.py simple simple being the name of the flock your are building a stand-alone application from. This will pack all necessary libraries and dependencies in the simple application, a process which turns the previously very lightweight compiled simple (~40 kB) into a 125 MB monster. |
| Last updated: May 15, 2024 |