- We don't support Windows as an operating system for ISO tools. Linux libraries are available, but only for the developer procedure. Please contact us, if you would like to install the Linux version.
For laptop users, we recommend connecting a mouse to your computer because you can use the scroll wheel to zoom in out of the flock and use the right mouse button to drag the display rotation around.
If you would like to interact with the flock, we recommend the following approach: 1) Read the Introduction section to ISO Flock to get a general understanding of a swarms inner workings and 2) Download the according "Control" application (a compiled Max/MSP application, that doesn't require Max/MSP to be installed or licensed). We are currently working on a generic "ISO OSC Control" patch that will work with all patches and give you a broader set of control possibilities.
- "Simple Control" (bz2, 7.8 MB)
- "Boids Control" (bz2, 7.8 MB)
- "Moths and Lights Control" (bz2, 7.8 MB)
- "Forcefield Control" (bz2, 7.8 MB)
- Generic "ISO OSC CTRL" application (zip, 25 MB) [will follow shortly (March 18, 2010)]
Developer's Installation Procedure
Great, you would like to have that cake and eat it too. Good choice! :-)
Your installation procedure will be segmented into several parts:
- Install or update to the newest available version of XCode
- Download and install all dependencies (third-party libraries used by ISO)
- Download and install all ISO frameworks
- Download and install Jack (only if audio is needed)
- Download the example flock projects and open the one with XCode that most likely fits your needs.
- Download the example synth projects and open the one with XCode that most likely fits your needs. (only if audio is needed)
- Compile and run the example projects separately (one build for flock and one for synth) and lean back and relax while looking at the visual splendor unfolding on your screen ;-)
Let's do that step by step:
1. Install or update to the newest available version of XCode
The newest version for your OS X can be downloaded directly from Apple's site: http://developer.apple.com/technologies/xcode.html
2. Download and install all dependencies
If you are a user of Mac OS X 10.5, please download the following package, extract it and install it:
Dependencies for Mac OS X 10.5 Leopard
Mac OS X 10.6 Snow Leopard users, please use this dependencies archive:
Dependencies for Mac OS X 10.6 Snow Leopard
This dependencies will all be installed into the directory /usr/iso which is hidden from the OS X Finder. But you can access it via the Terminal, e.g. by entering the command "open /usr/iso"
3. Download and install all ISO frameworks
If you are a user of Mac OS X 10.5, please download the following package, extract it and install it:
ISO Frameworks for Mac OS X 10.5 Leopard
Mac OS X 10.6 Snow Leopard users, please use this dependencies archive:
ISO Frameworks for Mac OS X 10.6 Snow Leopard
These will also be placed in /usr/iso.
4. Download and install Jack
You may skip this step, if you don't wan't to use the ISO synth engine (for audio output). Should you later decide to use it, you can always come back and redo these steps.
Download the appropriate version for your OS X version (10.5 or 10.6) from this page:
www.jackosx.com/download.html
You need to have JackPilot up and running in order to hear the results of ISOSynth. JackPilot is part of the dependencies package and can therefor be found in your /Applications folder (OS X). But before you start Jack, make sure you created a so called "Aggregate device" using the Audio MIDI setup in your /Utilities folder. Choose "Open Aggregate Device Editor" from the "Audio" menu and create an interface to your audio hardware. In case of your built-in speaker and microphone, the setup will likely look like in the following figure:
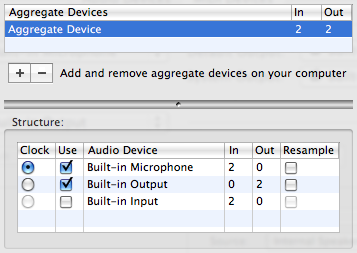
Aggregate Device Linking to OS X System Audio I/O
In JackPilot itself, make sure that this Aggregate Device is your audio interface (!), which can be easily done in the JackPilot Preferences.
5. Download the example flock projects.
You can download the example projects bundle here:
Example flocks XCode projects
For these XCode project, it doesn't matter which OS X version you are using as long as it's 10.5 or newer. Find the file that ends with .xcode inside the package you would like to use (for starters, we recommend "iso_simple" and open it with XCode.
6. Download the example synth projects.
We will provide a small set of synth projects for you to download and get started [TODO].
7. Compile the project you opened in XCode
Select the "active target" (upper left corner). For starters, we recommend the flock "simple", then click the button "Build and Run". Voilà!